  by
Connie Freeman by
Connie Freeman 
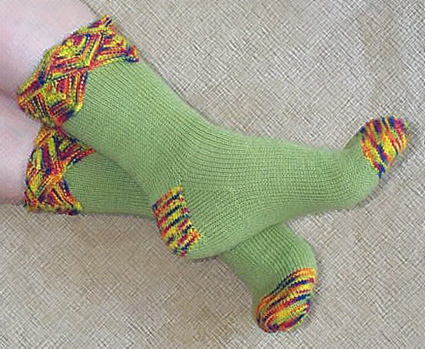
This sock is a great way to experiment
with different techniques. If you have never
knit a sock, this pattern demonstrates basic construction.
The mitered cuff is an easy, small project to test
this fun method. All socks are knit using the
same number of stitches. Change needle size to change
the circumference of the sock. Any size may be made
into the length desired.
Use your creativity to create a
special color scheme for each of your favorite friends
and relatives. |
|  model: Amanda
Freeman
photo: Amanda
Freeman and Connie Freeman
model: Amanda
Freeman
photo: Amanda
Freeman and Connie Freeman |
|
| S[M, L] |
| |
| |
|
[MC] Schoeller Stahl Fortissima Socka [75% wool, 25%
nylon; 210m per 50g skein]; color #1006: lime-green;
2 skeins
[CC] Steinbach Wolle Strapaz [80% wool, 20% nylon;
150 m per 50g skein]; color #112; 1 skein
Small: 1 set size U. S. #2/2.75 mm double point needles
(set of five)
Medium: 1 set size 3.00 mm double point needles (set
of five)
Large: 1 set size U. S. #3/3.25 mm double point needles
(set of five)
Yarn needle
|
| |
|
Small: 34 sts/40 rows = 4" in stockinette stitch
Medium: 32 sts/40 rows = 4" in stockinette stitch
Large: 30 sts/40 rows = 4" in stockinette stitch |
| |
| DD = double
dec with center st on top
Slip two sts tog knitwise from left needle
to right needle.
K the next st on the left needle.
Pass the two slipped sts over the st just knit and
off the needle.
Slp = slip st purlwise
Cuff Squares
Each square starts with 23 sts reduced
to 1 st by working a double decrease every other row.
Note that the first st in every row is knit into the
back of the st. The last st in every row is
slipped with the yarn held in front; the yarn will
be facing you. This is done to simplify picking
up sts.
Row 1: K.
Row 2: K 1 tbl, k9, DD, k9, slp 1.
Row 3: K 1 tbl, p19, slp 1.
Row 4: K 1 tbl, k8, DD, k8, slp 1.
Row 5: K 1 tbl, k8, p center stitch, k 8,
slp 1.
Row 6: K 1 tbl, k7, DD, k7, slp 1.
Row 7: K 1 tbl, p15, slp 1.
Row 8: K 1 tbl, k6, DD, k6, slp 1.
Row 9: K 1 tbl, k6, p center stitch, k6, slp 1.
Row 10: K 1 tbl, k5, DD, k 5, slp 1.
Row 11: K 1 tbl, p11, slp 1.
Row 12: K 1 tbl, k4, DD, k4, slp 1.
Row 13: K 1 tbl, k4, p center stitch, k4,
slp 1.
Row 14: K 1 tbl, k3, DD, k3, slp 1.
Row 15: K 1 tbl, p7, slp 1.
Row 16: K 1 tbl, k2, DD, k2, slp 1.
Row 17: K 1 tbl, k2, p center stitch, k2,
slp 1.
Row 18: K 1 tbl, k1, DD, k1, slp 1.
Row 19: K 1 tbl, p3, slp 1.
Row 20: K 1 tbl, DD, slp 1.
Row 21: K tbl, p center stitch, slp 1.
Row 22: DD. Fasten off.
|
Sock (make 2)
Bottom Row of Cuff
With CC, CO 23 sts and follow patt st for
Cuff Squares. Make 4 squares.
Middle Row of Cuff
With RS facing, pick up 11 sts along the
left side of one square beg with last bound-off
st. Pick up 12 sts along the right side of another
square. See diagram below.
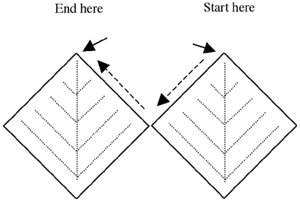
Follow patt st for Cuff Squares.
Rep twice, using third and fourth squares.
Rep one more time using the left side of the fourth
square and the right side of the first square.
The squares are now connected in a circular piece.
Upper Row of Cuff
With RS facing, pick up 1 st in peak of
middle-row square and 10 sts along the left side
of one square in the middle row. Pick up 1
st in peak of bottom-row square. Pick up 10
sts along the right side of the adjoining square
in that same row and pick up 1 st in peak of that
square. (23 sts).
Row 1: K.
Row 2: K10, DD, k9. Turn, leaving rem st
on the needle.
Row 3: Slp 1, p18. Turn, leaving rem st
on the needle.
Row 4: Sl1, k7, DD, k7. Turn, leaving the
rem 2 sts on the needle.
Row 5: Sl1, k6, p center stitch, k 7. Turn,
leaving the rem 2 sts on the needle.
Row 6: Sl1, k5, DD, k5. Turn, leaving the
rem 3 sts on the needle.
Row 7: Slp1, p10. Turn, leaving the rem
3 sts on the needle.
Row 8: Sl1, k3, DD, k7.
Place rem 15 sts on a contrasting
color of waste yarn. Rep twice more.
Rep once more but leave sts on the needle.
With RS of sock facing you, place 15 of the sts
held on the waste yarn on each of three spare needles.
(60 sts divided between 4 needles)
Turn work inside out so the WS
is facing. K one round. If any sts are
twisted, K these tbl on this round. Break
CC and change to MC. K 1 round.
Leg
Work even in 2x2 rib for 1 3/4 inches.
This ribbing will be hidden under the turned down
cuff.
Change to st st and work even for an additional
5 inches.
Heel Flap
K across the 15 sts on needle #2 with needle
#1. You now have 30 sts on one needle and
15 sts each on the other two needles. You
will be knitting on the first 30 sts to complete
the heel flap.
Break MC and change to CC.
Reinforcing stitch for
heels:
Row 1: Sl 1, k1 across the row.
Row 2: Sl 1, p across.
Rep these 2 rows 15 times more. Break CC and change
to MC.
Turning the Heel
K17, ssk, k1. Turn.
Sl 1, p5, p2 tog, p1. Turn.
Sl 1, k to 1 st away from gap, ssk, k1. Turn.
Sl 1, p to 1 st away from gap, p2 tog, p1. Turn.
Cont as established until all sts on both sides
have been worked. (18 heel sts)
Heel Gusset
With RS facing, k 9 heel sts. Using a spare
needle, k rem 9 heel sts.
Using the same needle, pick up and k 16 sts along
the side of the heel flap.
K across the 30 sts on the next two needles.
Using a spare needle, pick up and k 16 sts along
the other side of the heel flap.
Using this same needle, k the 9 rem heel sts.
(Needles #1 and #4 have 25 sts each, Needles #2
and #3 have 15 sts each).
Gusset Shaping
Round 1: K to 3 sts away from
the end of needle #1; k2 tog, k1. K across
needles #2 and #3. On needle #4, k1, ssk.
K to end of needle #4.
Round 2: K.
Rep these two rows 9 times more. (15 sts on each
needle).
Work even in st st until sock measures 2 inches
less from heel to toe than the length you want your
sock to be.
Toe Shaping
Break MC and change to CC.
Toe Dec Round:
Needle #1: K to 3 sts away from end, k2 tog, k1.
Needle #2: K1, ssk, k to end.
Needle #3: K to 3 sts away from end, k2 tog, k1.
Needle #4: K1, ssk, k to end.
*Work 3 rounds even.
Work 1 dec round.
Work 2 rounds even.
Rep from * twice more.
**Work 1 dec round.
Work 1 round even.
Rep from ** 3 times more.
Work every foll round as
a dec round until 8 sts rem, 2 on each needle.
Break yarn leaving a 12-inch tail.
|
Put the top half of
the sts on one needle, the bottom half on another.
With WSs facing each other, use Kitchener St to graft
the toe tog.
Weave in all ends. |
| 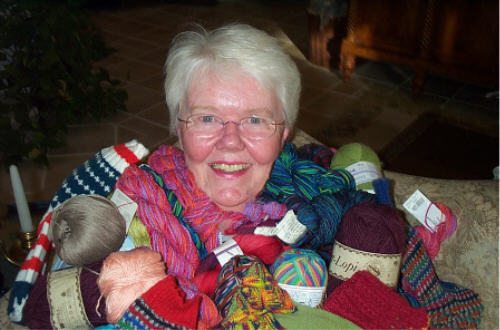 Connie
has been knitting since elementary school. She is
constantly in search of captivating yarns, fascinating
patterns and clever techniques. An inveterate shopper,
she strives to get it into the house unnoticed and
constantly seeks places to stow her stash. You can
see she is entrenched in yarn and projects. Connie
has been knitting since elementary school. She is
constantly in search of captivating yarns, fascinating
patterns and clever techniques. An inveterate shopper,
she strives to get it into the house unnoticed and
constantly seeks places to stow her stash. You can
see she is entrenched in yarn and projects.
|
| Pattern & images
© 2004 Connie Freeman. Contact Connie. |
|